I recently decided to migrate away from GoDaddy and run my own server to host this site. After doing some research, I found that DigitalOcean was both cheap—my server costs me $5 a month for the server and $1 for automatic weekly hot backups—and reliable. That said, below is a quick guide on the very initial steps of setting up an Ubuntu server on DigitalOcean.
Create a Droplet
Select a Droplet
There are four options that you can select from under “Choose an image.”
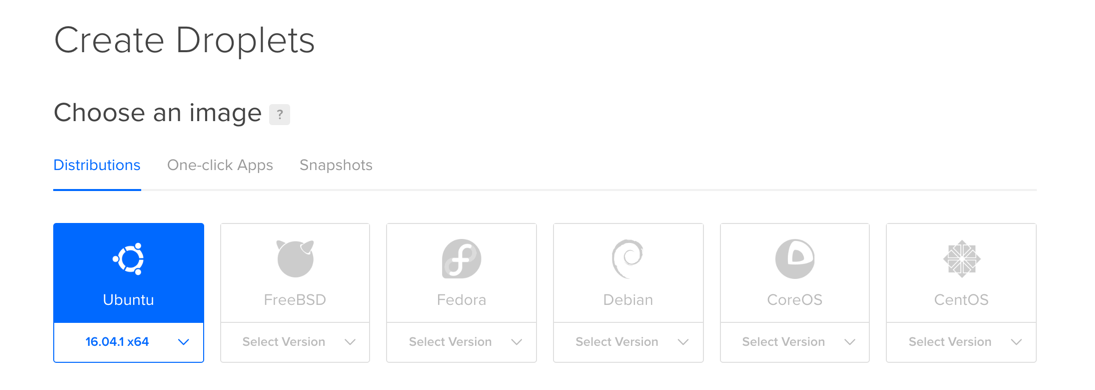
- Distributions - this option provides you with a number of pre-built vanilla builds of a several of Linux and Unix distributions.
- One-click Apps - this option provides you with a number of pre-built distributions with pre-configured programs such as LAMP, WordPress, Drupal, etc.
- Snapshots - this option provides you with a list of previously created snapshots (if you already have another droplet).
- Backups - this option provides you with a list of previously created backups (again, if you already have another droplet).
You are free to select any of the above, but for the purposes of this tutorial, we’ll be using the vanilla version of Ubuntu 16.04.
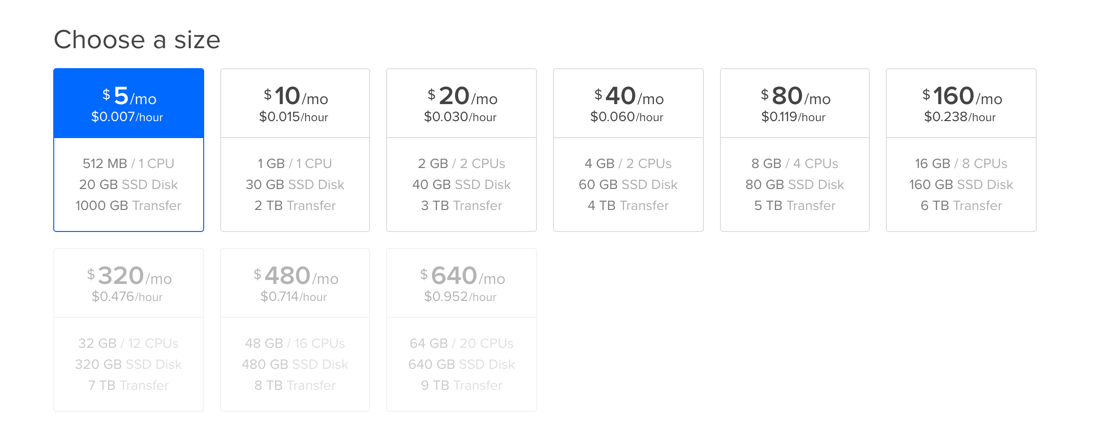
Select Your Droplet Size
DigitalOcean offers a number of droplet sizes, ranging from a teeny droplet with a single core CPU, 512MB of RAM, a 20GB SSD and 1TB of data transfer for $5 up to a massive twenty core CPU with 64GB of RAM, a 640GB SSD and 9TB of data transfer for $640 a month! You should pick the size of your server based on your needs and budget. It is good to remember that you can always scale up, but aren’t able to scale up. (I went with the modest $5 a month baby server.)
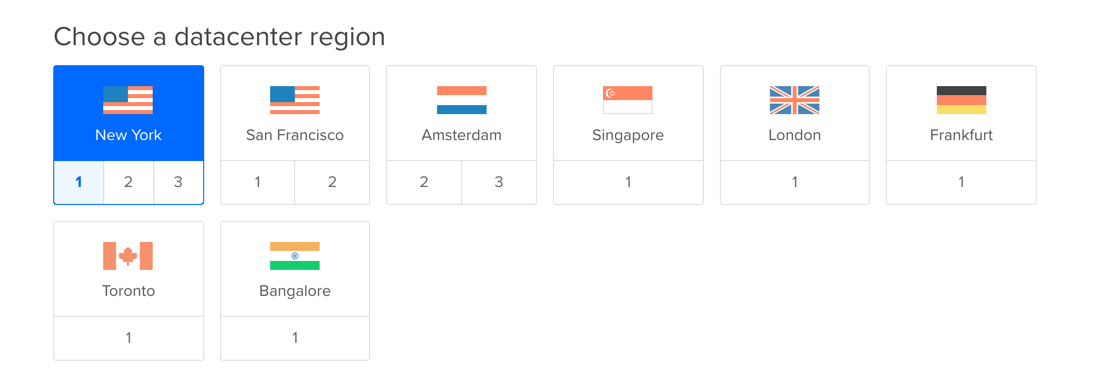
Select Your Droplet Datacenter
DigitalOcean has a number datacenters in North America, Europe and Asia. There is no real benefit to selecting a far off datacenter for your server—in fact if you plan on running your own VPN, it’s not beneficial at all—so it’s best to select the closest data center to house your droplet.
Select Your Additional Options
There are a number of additional options that you can select when creating your droplet (all of which can be set up after the fact if you change your mind.)

- Private Networking - this option allows you to have droplet-to-droplet networking
- Backups - this option enables automatic weekly hot backups
- IPv6 - this option enables publicly accessible IPv6 networking
- User Data - this option enables you to use cloud-init files to set up your droplet
Optional: Select Your SSH Keys
If you already have SSH keys set up, you can add them to the droplet now. (We’ll be doing this later.)
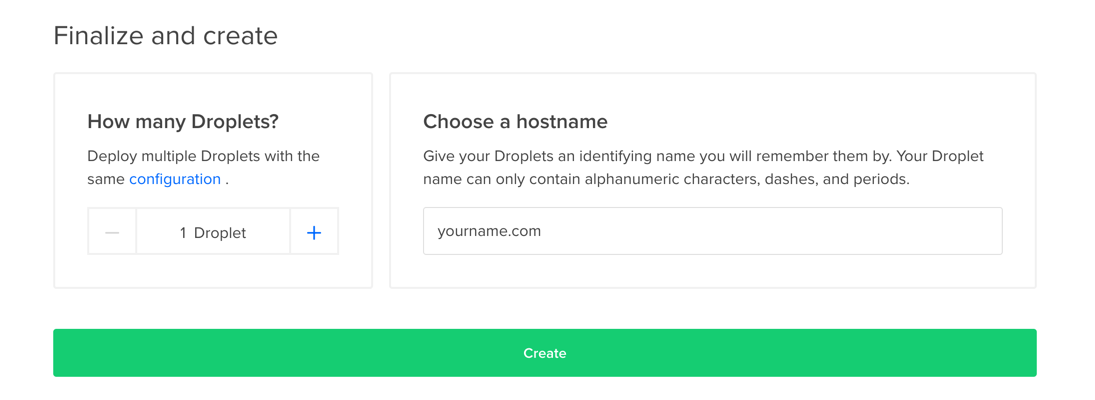
Name and Create Your Droplet
Once you’ve gone through the initial steps, you’ll have a droplet with a name based on your selections. (In my case the name of my droplet defaulted to “ubuntu-512mb-nyc1-01.”) At this point in time, you’ll want to give your droplet it’s hostname. You might want to go with the fully qualified domain name that you will be using (i.e. yourname.com).
Once your droplet has been created, the e-mail address that you used when signing up for DigitalOcean for the information about your newly created droplet. It will have all of the information that you will need to sign in and secure your droplet. (Highlighted below.)
From: “Digital Ocean” support@support.digitalocean.com
Subject: Your New Droplet: yourname.com
To: you@yourname.comYour new Droplet is all set to go! You can access it using the following credentials:
Droplet Name: yourname.com
IP Address: 123.123.123.123
Username: root
Password: 0123456789abcdef…
Logging In and Securing Your Droplet
With the information from your e-mail from DigitalOcean, you can either login using OpenSSH (macOS and Linux) or PuTTY (Windows).
Logging in as Root (OpenSSH)
Initiate a connection to your server by opening a Terminal window and SSHing into the server using your server’s IP address:
ssh root@123.123.123.123
You can now skip down to Setting Root’s Password.
Logging in as Root (PuTTY)
Open PuTTY, enter the following information about your server an the appropriate fields and press Open.
- Host Name (or IP address) - your droplet’s IP address
- Port - 22 (this is the default port)
- Connection type - SSH (this is the default connection type
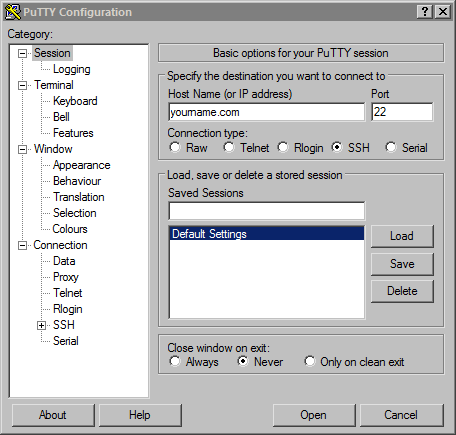
Once your PuTTY session opens, log in as root:
login as: root
Setting Root’s Password
Since this is the first time you are logging into your new droplet, you’ll probably see a warning that the authenticity of your host can’t be established. This is just telling you that your server is unrecognized. Just type yes and hit Enter.
The authenticity of host '123.123.123.123 (123.123.123.123)' can't be established.
ECDSA key fingerprint is
12:34:56:78:9a:bc:de:f:ed:ca:98:76:54:32:10:ff.
Are you sure you want to continue connecting (yes/no)?
You will now be asked for root’s password. Type in the temporary password you were sent in your e-mail, then proceed to change your password by first authenticating your temporary password then setting and confirming your new password. I won’t give you a lecture about picking a good password, just make sure that you do!
Welcome to Ubuntu 16.04.1 LTS (GNU/Linux 4.4.0-31-generic x86\_64)

 \* Documentation:  https://help.ubuntu.com
 \* Management:     https://landscape.canonical.com
 \* Support:        https://ubuntu.com/advantage

0 packages can be updated.
0 updates are security updates.

Changing password for root.
(current) UNIX password:
Enter new UNIX password:
Retype new UNIX password:
Create Your User Account and Give Yourself Root Privileges
After you’ve logged in as root, it is a very good idea to create an account and not use root for day-to-day server work. This is because root has very broad administrative privileges and it is very easy to make destructive changes to your environment accidentally.
Creating a new user is a straight-forward process—you just adduser. Much like your initial login with root, you will be asked to enter a new password for your new user.
adduser yourname
Adding new group 'yourname' (1000) ...
Adding new user 'yourname' (1000) with group 'yourname' ...
Creating home directory '/home/yourname' ...
Copying files from '/etc/skel' ...
Enter new UNIX password:
Retype new UNIX password:
You’ll also be asked to enter some optional information about the user account. All of these questions are optional, so feel free to hit Enter, then Y when you’re done.
Enter the new value, or press ENTER for the default
        Full Name \[\]:
        Room Number \[\]:
        Work Phone \[\]:
        Home Phone \[\]:
        Other \[\]:
Is the information correct? \[Y/n\]
Now that you have made yourself an account, you’ll want to give yourself root privileges. Doing so will allow you to run commands with administrative privilege by prefacing the command with sudo (super user do). You can add yourself to the list sudoers by using the usermod command:
usermod -aG sudo yourname
Testing Your Account and Securing root
Now that you’ve created an account, it’s time to test it out. To do this, simply log out and log back in with your new user name. You can log out by either typing exit or pressing Ctrl+d. Then log back in as you did before when logging in as root.
Now that you are in the server with your newly created account, we can kill two birds with one stone and test your sudo permissions and secure your root account from being accessed via SSH by editing the sshd_config file:
sudo nano /etc/ssh/sshd\_config
You will now be prompted to enter your password. After doing so, nano should open. You are a sudoer!
[sudo] password for yourname:
Your last step in securing our root account (which you shouldn’t need to use anymore) is to disallow SSH access to root. To do so, find the following lines and change PermitRootLogin yes to PermitRootLogin no, hit Ctrl+O to save the file and Ctrl+X to exit nano.
\# Authentication:
LoginGraceTime 120
PermitRootLogin no
StrictModes yes
Once you’re out of nano, restart the SSH server to put the change into effect and you’re good to go.
service sshd restart
What Now?
The sky’s the limit! Want to host a plain Jane LAMP server? You can! Want to host a pre-built WordPress site? Go for it. Want to set up your own VPN to use when you’re surfing the net on the pubic wifi when you’re in another city? Completely doable. Worried about keeping hackers at bay? There are a number of things that you can do to beef up your security even more.
However… we’ll save that for another article.